
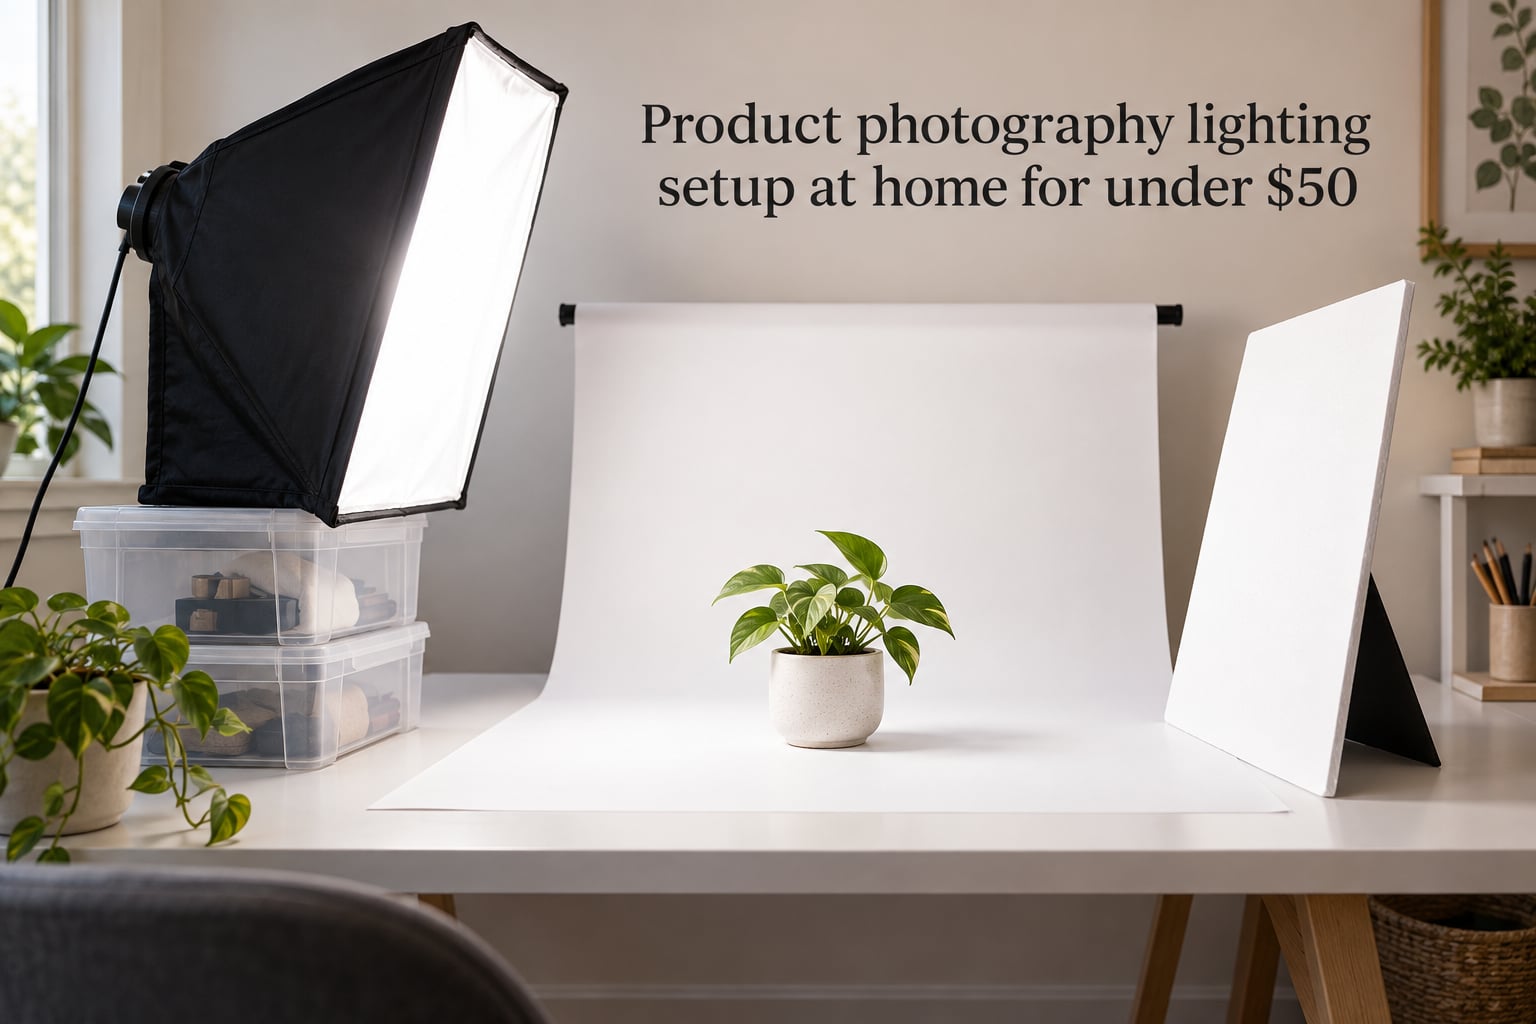
You can build a complete product photography lighting setup at home for under $50 using one 24×24 softbox (around $20), a 40W daylight LED corncob bulb (around $15), and a foam-board reflector (around $5), all mounted on a stack of plastic storage boxes instead of a light stand. That single kit gives you soft, even, color-accurate light for ecommerce product shots on Amazon, Etsy, or Shopify, and you can grow from there as sales do.
I have been photographing products in our family studio for years, and I still use a stripped-down version of this exact setup for quick reselling jobs. It is the same rig DSLR Video Shooter popularized in his $50 lighting video back in 2017, and it is still the most asked-about budget setup on Reddit’s r/photography and r/Flipping today.
If you have been wondering what “softbox” even means, whether a ring light will do the job, or whether you really need a second light, this guide will walk you through every part of a working product photography lighting setup at home under $50. You will get the gear list, the build steps, the camera settings, and the mistakes to skip.
Table of Contents
- Why Lighting Matters More Than Camera for Product Photography
- The Complete $50 Gear List (Current Prices)
- Step-by-Step Build: The Plastic-Box Softbox Mount
- Light Positioning: The 45-Degree Key + Foam-Board Fill
- Three Lighting Setups Under $50 (1-Light, 2-Light, Window + Reflector)
- Camera Settings to Match the Setup (ISO, Aperture, White Balance)
- White Background Ecommerce Setup on a Budget
- What NOT to Buy Under $50 (Common Traps)
- Troubleshooting Common $50 Setup Problems
- Frequently Asked Questions
- What kind of lighting is best for product photography at home?
- What is the 3 lighting rule in photography?
- What is the best budget lighting kit for photography under $50?
- What are some DIY lighting options for product photography?
- What is the 20 60 20 rule in photography?
- What is the best affordable camera for product photography?
- Final Thoughts: Your $50 Studio Is Ready
Why Lighting Matters More Than Camera for Product Photography
Lighting is the single biggest factor in product photo quality. A phone camera with great light beats a $2,000 DSLR with bad light almost every time, because light controls shadow softness, color accuracy, and how “pro” the product looks in a buyer’s scroll.
For ecommerce specifically, lighting decides three things that move the conversion needle. It controls color so your product looks the same in the photo as it does in real life. It shapes the shadows so buyers can read the form and texture of what they are buying. And it creates consistency across a catalog, which builds trust with shoppers comparing two or three of your listings.
That is why I always tell small-business owners to spend their first photography dollar on light, not glass. A solid lighting setup under $50 will outperform a sharper lens on a poorly lit subject, every time.
The Complete $50 Gear List (Current Prices)
Here is the exact shopping list our team uses to teach first-time product photographers. Every item is widely available on Amazon, and the total comes in comfortably under the $50 mark.
- Neewer 24×24 inch softbox with E27 socket (~$20). This is the workhorse of the rig. The 24×24 size is the sweet spot for tabletop products, large enough to soften shadows but small enough to fit on a desk.
- 40W LED corncob bulb, 5000K daylight balanced (~$15). A “corncob” is a bulb with dozens of small LEDs arranged like corn kernels on the cob. Look for CRI 90+ so colors render accurately.
- Black foam board (~$3) and white foam board (~$3). Black absorbs spill light, white bounces light back into shadows. Get one of each at any craft store.
- Two plastic storage boxes (free if you already own them). The cheapest light stand you will ever build. Any flat-topped bin works.
- White poster board or seamless paper roll (~$5). Your first backdrop. A roll of white paper from a craft store is the industry term “seamless backdrop,” and it is what most Amazon listing photos are shot on.
Total spent: about $46 before tax, with the plastic boxes coming from your closet. That is your entire studio.
A quick glossary: a softbox is a fabric box that turns one hard bulb into a large, soft light source. Continuous lighting means the light stays on (unlike a camera flash), so you can compose and focus with the exact light your photo will have. CRI (Color Rendering Index) is a 0-100 score for how accurately a light shows colors; anything above 90 is photography-grade.
Step-by-Step Build: The Plastic-Box Softbox Mount
This is the trick that makes the whole setup work without buying a light stand. Here is the build, exactly as DSLR Video Shooter shows in the video we will mention later.
- Find two plastic storage boxes of similar height. A standard 12-quart tote works great. Stack one on top of the other on your shooting surface, leaving a small ledge on one side.
- Set the softbox on the ledge so the E27 socket hangs off the edge of the top box. The softbox’s own bracket becomes a stable perch.
- Screw the 40W LED corncob bulb into the E27 socket while the softbox is unplugged. Never touch a bulb with wet hands.
- Tilt the softbox by removing boxes from one side, so the light points down at a 30-45 degree angle toward your product. This is your “key light,” the main light shaping the product.
- Place the product on a flat surface 2-3 feet in front of the softbox. Closer equals softer shadows; farther equals harder shadows.
- Plug the bulb in and confirm the light fires. A single 40W LED is bright enough at 2-3 feet for typical tabletop product work.
- Add the white foam board on the opposite side of the product from the softbox. This is your “fill” – it bounces light back into the shadow side so the product looks balanced instead of half-lit.
That is the entire rig. Seven steps, no tools, and you have a working studio.
Light Positioning: The 45-Degree Key + Foam-Board Fill
The single biggest lighting rule for product photography is the 45-degree rule. Place your key light at roughly 45 degrees to the side of the product and 45 degrees above it. That single position gives flattering shape to almost any object.
From there, you adjust in three directions. Moving the softbox closer softens the shadows (good for reflective items like jewelry or bottles). Moving it farther hardens the shadows (good for textured items like fabric or wood). Tilting it higher moves the highlight on the product upward, which feels more “hero shot.” Tilting it lower brings the highlight down, which feels more casual and editorial.
On the opposite side of the product, your white foam board sits roughly at the same height as the product, angled to catch the light spilling off the back of the softbox and bounce it back into the shadow. The black foam board goes on the side you want darker, to absorb spill light and deepen contrast.
For shiny products – think lip gloss bottles, watches, or chrome – pull the softbox farther back and use a larger diffusion surface. The closer a small light source sits to a shiny object, the brighter and more concentrated its reflection becomes, which is exactly what you do not want.
Three Lighting Setups Under $50 (1-Light, 2-Light, Window + Reflector)
The one-light softbox setup above covers most ecommerce work, but there are three configurations worth knowing. Pick the one that matches the products you shoot most.
1-Light Setup: Softbox at 45 degrees, white foam board opposite, product on a sweep. This is the DSLR Video Shooter setup and our daily driver for Amazon listings. It is fast, repeatable, and works for nearly every matte or low-gloss product.
2-Light Setup: Softbox as key on one side, a second softbox or cheap LED panel as fill on the other. Adds about $20 to the cost if you reuse the same corncob bulb and add a second small panel. Best for highly reflective items or large products where one light cannot cover evenly.
Window + Reflector Setup: Place the product near a north-facing window, use the foam board as a bounce, and add the LED softbox as a rim or accent light behind the product. This is the cheapest setup of all (the window is free) and it is unbeatable for soft, natural-looking lifestyle shots of food, fabric, or handmade goods.
Camera Settings to Match the Setup (ISO, Aperture, White Balance)
The right camera settings make or break a $50 lighting setup. Use these as your starting point and adjust from there.
Set your camera to Manual mode so the look is repeatable shot to shot. Use ISO 100 for the cleanest image (every camera performs best at its lowest native ISO). Set your aperture between f/8 and f/11 – this gives full product sharpness from front to back, which matters for ecommerce where buyers want to see texture and detail.
Set your shutter speed to 1/125 if you are shooting handheld, or drop to 1/60 if you are on a tripod and the subject is still. The LED bulb is continuous light, so shutter speed mostly controls ambient room light, not the main exposure.
Set your white balance manually to 5000K (or “Daylight” preset) to match the corncob bulb. Auto white balance will drift shot to shot and force you to color-correct every file. Shoot a single white card or piece of white paper under the light once, and you can use that as a custom white balance reference.
White Background Ecommerce Setup on a Budget
For Amazon, Etsy, and most marketplace listings, you need a pure white background (#FFFFFF). Here is how to get it without a sweep system.
Buy a roll of white poster board or seamless paper from a craft store for about $5. Curl the paper into a soft “L” shape that runs flat under the product and up the wall behind it, with no visible seam. Tape the back edge to a wall or box, and weight the front edge so the paper lies flat under the product.
Shoot from a tripod so the camera angle stays consistent. The white foam board on the fill side will brighten the shadow under the product. In post, bump the background up to pure white using a levels or curves adjustment, and mask the product out if needed.
If you outgrow the paper roll, the next step is a real seamless paper sweep system on a stand, which costs about $80-100. But for your first $50, the paper roll + foam board trick is the same workflow professional studios used before sweeps became cheap.
What NOT to Buy Under $50 (Common Traps)
After years of testing budget gear, here are the five things I tell people to skip when shopping for a setup under $50.
Ring lights. They look great for selfies but they flatten product texture and create a doughnut-shaped reflection on anything shiny. A small softbox beats a ring light every time for product work.
RGB-only LED panels. The color-changing is fun for video, but the daylight white mode on cheap RGB panels usually has poor CRI, often in the 70s. That means yellows look greenish and skin tones look washed out. Stick with a single-purpose daylight LED.
Flimsy plastic tripods under $15. They will tip the moment you add a softbox. Spend the difference on a used full-size tripod or just stick with the plastic-box mount.
“1000W equivalent” LED bulbs. Wattage equivalents are marketing math, not actual light output. A 40W LED corncob at 5000K with CRI 90+ is what you want, regardless of how it compares to an old incandescent.
Speedlight flash kits at this budget. A cheap speedlight and trigger setup at $50 will underperform a $50 continuous LED softbox by a wide margin. Continuous light is the right answer for beginners because what you see is what you capture.
Troubleshooting Common $50 Setup Problems
Even with the right gear, three problems show up over and over. Here is how our team fixes each one in seconds.
Hot spot in the middle of the product: The softbox is too close, so the brightest part of the diffusion fabric shows up on the subject. Pull the softbox back 6-12 inches or add a second layer of diffusion (a white bedsheet clipped over the front works in a pinch).
Yellow or orange color cast: Your white balance is set wrong, or the bulb is not truly 5000K. Shoot a custom white balance off a white card, and double-check the bulb packaging for the Kelvin rating.
Uneven light across the product: Your softbox is smaller than the product, or it sits too close. Either move the softbox back, switch to a 32×32 softbox, or move the product farther from the camera so it fills less of the frame.
Harsh, dark shadows: The fill reflector is too far or angled wrong. Bring the white foam board closer to the product and angle it to catch the spill light directly.
Frequently Asked Questions
What kind of lighting is best for product photography at home?
A single continuous LED softbox at 5000K daylight balanced with CRI 90 or higher is the best home lighting for product photography. A 24×24 softbox with a 40W LED corncob bulb gives soft, even light that flatters texture and renders colors accurately for under $50.
What is the 3 lighting rule in photography?
The 3 lighting rule refers to using three separate lights in product and portrait work: a key light as the main source, a fill light to soften shadows on the opposite side, and a rim or back light to separate the subject from the background. For a $50 setup, you can fake the same effect with one key softbox, a white foam-board fill, and a black foam-board flag to control spill.
What is the best budget lighting kit for photography under $50?
The best budget kit is a Neewer 24×24 softbox (about $20), a 40W daylight LED corncob bulb (about $15), a white foam-board reflector (about $5), and a black foam-board flag (about $3). Mount the softbox on two plastic storage boxes for a complete studio for around $43 total.
What are some DIY lighting options for product photography?
Common DIY options include plastic storage boxes as light stands, white foam board as a reflector, a white bedsheet as an extra diffuser, a north-facing window as the key light, and a roll of white poster paper as a seamless backdrop. Resellers on Reddit’s r/Flipping also report success with 4ft LED shop lights zip-tied to existing umbrella stands for around $30.
What is the 20 60 20 rule in photography?
The 20 60 20 rule is a composition guideline: place the main subject in the central 20 percent of the frame, use the surrounding 60 percent as supporting space, and leave the outer 20 percent as breathing room. It is a portrait framing trick more than a product photography rule, but it can help when you shoot lifestyle product shots with a model.
What is the best affordable camera for product photography?
For a $50 lighting setup, any modern DSLR or mirrorless camera in Manual mode will outwork the gear. Entry-level used models like a Canon Rebel, Nikon D3x00 series, or Sony a6000 line run a couple hundred dollars used and pair perfectly with this lighting rig. A recent smartphone on a tripod with manual controls also works surprisingly well once the lighting is right.
Final Thoughts: Your $50 Studio Is Ready
A product photography lighting setup at home under $50 is genuinely enough to shoot sellable images for ecommerce, Etsy, and Amazon listings. The kit is one softbox, one daylight LED bulb, foam board, and a plastic-box mount, and it produces soft, color-accurate, repeatable light that any small business can grow into.
If you want a single video to watch while you build this, the DSLR Video Shooter $50 setup video on YouTube is the one every reseller on r/photography and r/Flipping still recommends. Start there, follow the seven build steps above, and your first shoot will look better than 90 percent of the listings in any handmade marketplace.