
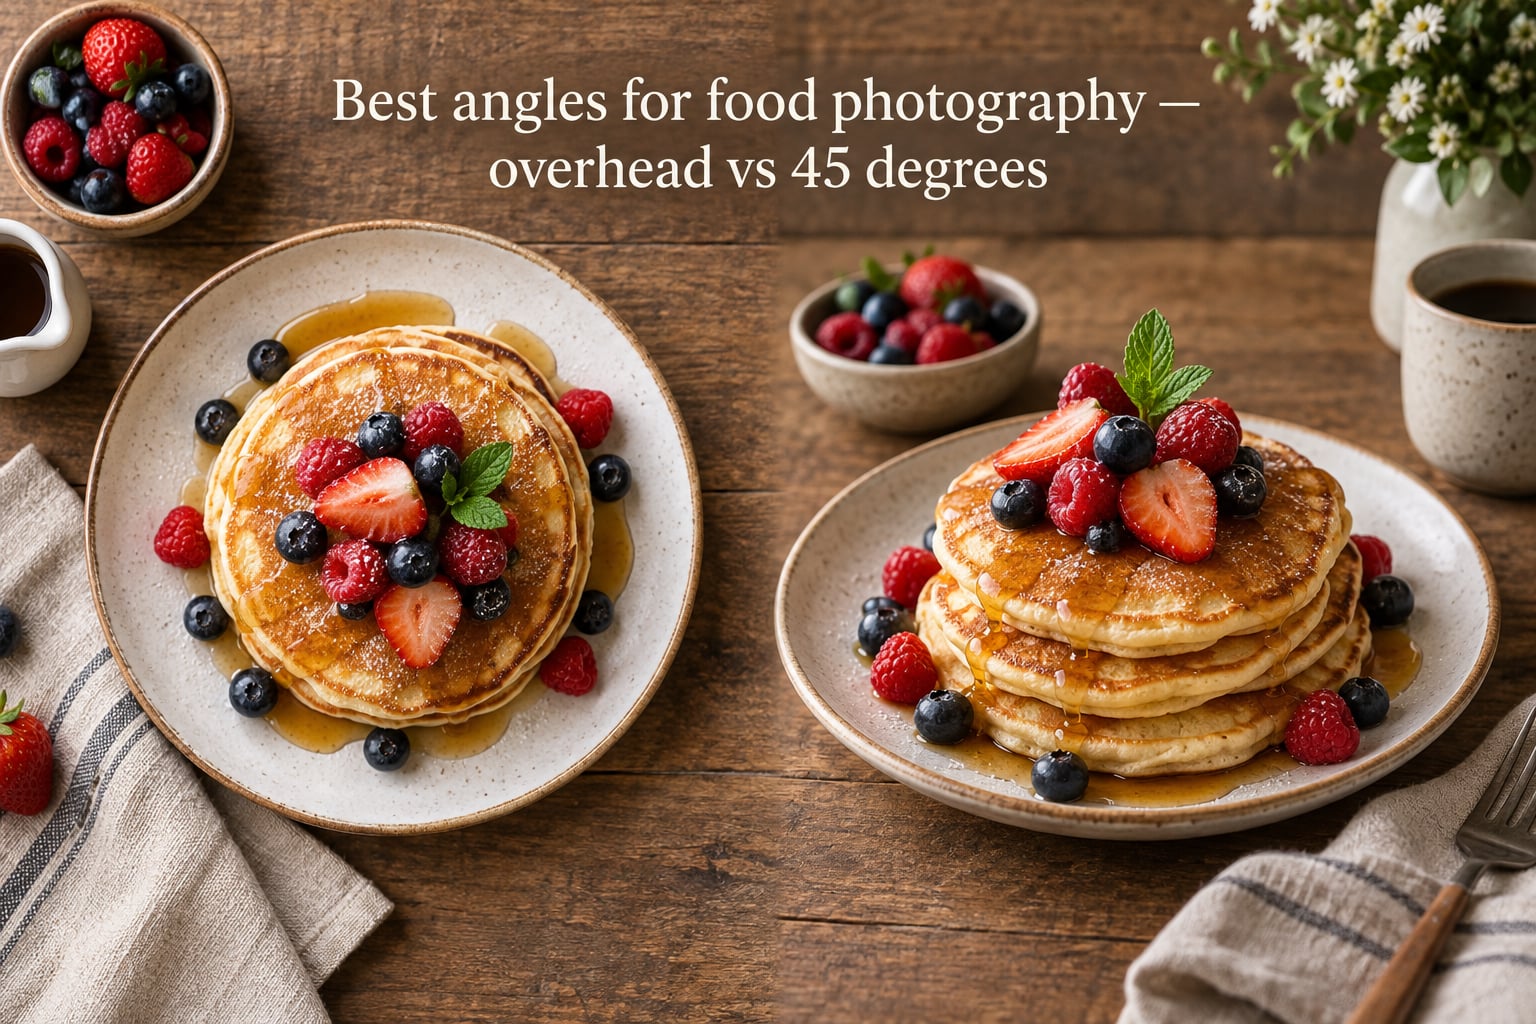
Pick up any cookbook or scroll a food blog for ten seconds and you will notice the same thing: the best angles for food photography are almost always either straight down from above or slightly raised at 45 degrees. Those two views — overhead and the 3/4 angle — do about 90% of the heavy lifting in food photography, and learning when to use each will change your photos immediately.
I have shot food for restaurants, cookbooks, and recipe blogs for years, and the single biggest jump in image quality came from choosing the right angle before I ever touched a prop. Most beginners pick a beautiful plate, style it carefully, then shoot it from whatever angle their hands default to — usually a casual 3/4 view. That works sometimes, but it leaves a lot on the table.
This guide breaks down overhead (90°) and 45-degree food photography side by side: what each angle is, the dishes each one flatters, the gear that makes the shot easier, the mistakes that ruin each angle, and a simple rule for choosing between them in under five seconds. Whether you shoot with a DSLR, a mirrorless body, or just an iPhone, the same logic applies.
Table of Contents
- Quick Answer: What Is the Best Angle for Food Photography?
- Quick Decision Rule: Overhead vs 45-Degree
- What Are the Main Angles in Food Photography?
- The Overhead (90-Degree) Angle: When It Works
- The 45-Degree Angle: When It Works
- Overhead vs 45 Degrees: Side-by-Side Comparison
- Common Mistakes at Each Angle
- Smartphone and iPhone Tips for Both Angles
- Frequently Asked Questions
- Conclusion
Quick Answer: What Is the Best Angle for Food Photography?
The best angle for food photography depends on the dish. Overhead (90°) works best for flat, colorful, or patterned foods photographed in bowls, plates, or pans — pizza, smoothie bowls, pancakes, salads, and tablescapes. The 45-degree angle (3/4 view) works best for taller, layered, or stacked dishes where you want to show both the top and the side — burgers, layered cakes, tall glasses, and sandwiches.
As a default, shoot the same dish at both angles and pick the one where the food’s best feature is visible. That single habit will solve most of your angle problems before they start.
Quick Decision Rule: Overhead vs 45-Degree
Use this rule the next time you set up a shot:
- Choose overhead (90°) when the dish is flat, the pattern or toppings are on the top surface, and the side profile is plain.
- Choose 45-degree when the dish has visible height, layers, dripping sauce, or texture on the sides that you want to show.
- When in doubt, shoot both. Tethered or chimping, the correct answer almost always reveals itself.
That is the entire decision in three lines. Everything else in this article is the reasoning behind that rule.
What Are the Main Angles in Food Photography?
Food photographers use five standard angles, named by the camera’s position relative to the table:
- Overhead (90°) — the camera points straight down. Also called top-down, flat lay, or bird’s-eye view.
- 75° — almost overhead, but the camera is tilted forward enough to see a hint of the side of the food.
- 45° (3/4 view) — the camera is halfway between overhead and table level. Most people naturally see food from this angle.
- 25° — closer to straight-on, often used to give a dish drama or to show height.
- Straight-on (0°) — the camera sits at table level looking across. Best for tall subjects like layered cakes or burgers.
Of those five, overhead and 45-degree cover the majority of editorial and commercial food photography. The other three are specialty angles you reach for once you know what story you want to tell.
The Overhead (90-Degree) Angle: When It Works
Overhead food photography — also called top-down or flat lay — places the camera directly above the dish so the food’s top surface fills the frame. It is the angle of choice for food blogs, Instagram grids, and cookbook step photos because it shows the entire plate at once and reads clearly on a phone.
Best Dishes for the Overhead Angle
- Pizza, pie, tarts, and cookies — flat tops with toppings arranged across the surface.
- Smoothie bowls, pancakes, waffles — the toppings are the story.
- Salads and pasta — patterns of color, ingredients, and garnishes sit on the surface.
- Tablescapes — a full table layout with multiple plates, props, and hands.
- Recipe step photos — flour on a board, dough being rolled, ingredients laid out.
Strengths of Overhead
Overhead flattens perspective, so viewers see the entire composition at once. There is no hidden side of the plate and no awkward foreshortening. It is also the easiest angle to style into a clean, repeatable grid — which is why flat lay food photography dominates Instagram and Pinterest.
Setup and Gear
Overhead shots require a tripod with a horizontal arm or a C-stand so the camera can sit directly over the food without the legs intruding on the frame. A 50mm lens is the workhorse for overhead because it has minimal distortion; an 85mm gives more breathing room if you need to crop tighter. Use a bubble level on the hot shoe to keep the sensor perfectly parallel to the table — even a one-degree tilt throws the corners off.
Where Overhead Falls Flat
Overhead hides height. A towering sandwich, a layered cake, or a drink in a tall glass will look like a flat disc from straight down. Anything with visible texture on the sides — pulled pork, dripping cheese, frosted sides — gets compressed into a top-only view and loses its appetite appeal.
The 45-Degree Angle: When It Works
45-degree food photography — also called the three-quarter view or 3/4 angle — sits the camera halfway between overhead and table level. It is the angle your eyes naturally use when you look down at a plate in front of you, which is why food shot at 45 degrees tends to feel immediate and inviting.
Best Dishes for the 45-Degree Angle
- Layered cakes, tiramisu, and parfaits — the layers are the story.
- Burgers and sandwiches — height plus filling on the sides.
- Stacked pancakes, waffles, French toast — drips and stack height matter.
- Tall drinks, smoothies in glass jars, milkshakes — visible glass and contents.
- Hot dishes with steam or sauce drizzle — the action reads at 45° better than from above.
Strengths of 45-Degree
The 45-degree angle shows both the top and the side of the food in a single frame, so viewers see the full structure of the dish — a burger’s bun, fillings, and plate all at once. It is also the angle that reads as “about to eat,” which is the emotional trigger most food photography tries to hit. On r/foodphotography and r/AskPhotography, photographers repeatedly describe 45° as “the angle that makes food look like food.”
Setup and Gear
A standard tripod at table height is enough. An 85mm lens is the most flattering choice at 45 degrees because it keeps the back of the dish from looking tiny compared to the front. Use f/4 to f/5.6 for shallow depth of field on a single hero dish, or f/8 if the entire plate needs to be sharp. A 50mm works for wider tablescapes if you keep the camera back a bit.
Where 45-Degree Falls Flat
At 45 degrees, tall subjects like wine bottles and layered cakes can stretch into lens distortion — straight lines bow outward, and the back of the dish compresses. This is the most common 45-degree mistake beginners hit, especially with wide-angle lenses under 35mm. It also hides the full top of the dish, so a perfectly arranged pizza or salad loses its pattern.
Overhead vs 45 Degrees: Side-by-Side Comparison
Here is the same shot logic at a glance. Pick the column that matches your dish.
| Feature | Overhead (90°) | 45-Degree (3/4) |
|---|---|---|
| Best for | Flat, patterned, or topped foods | Tall, layered, or stacked foods |
| Shows side of dish | No | Yes |
| Shows top surface | Yes, fully | Yes, partially |
| Lens recommendation | 50mm | 85mm |
| Aperture | f/5.6 – f/8 for full sharpness | f/4 – f/5.6 for shallow depth |
| Tripod needed | Yes, with horizontal arm or C-stand | Yes, standard tripod |
| Distortion risk | Low if level | Medium, watch wide angles |
| Best platform | Instagram, Pinterest, recipe steps | Cookbooks, menus, editorials |
Same Dish, Both Angles
Shoot one dish twice — once from straight overhead and once at 45 degrees — and the difference is immediate. A flatbread pizza with even toppings looks like a poster from above but feels distant. The same pizza at 45 degrees shows the crust’s char, the cheese pull, and the herbs on top all in one frame. A layered cake at overhead shows the top decoration only; at 45 degrees, every frosting layer and the height of the cake become part of the image. Use this trick when you are unsure: shoot both, then choose.
Common Mistakes at Each Angle
Overhead Mistakes
- Camera not level. A 1° tilt at 90° makes one side of the frame slightly stretched. Use a hot-shoe bubble level every time.
- Wide aperture, missed focus. At f/2.8 from above, the back of the plate can go soft. Stop down to f/5.6 or f/8.
- Tripod legs in the frame. The classic beginner overhead mistake. A horizontal arm or C-stand solves it.
- Harsh shadows from the photographer. Stand back from the table or use a wireless trigger so your shadow does not fall on the food.
45-Degree Mistakes
- Wide-angle lens distortion. Anything under 35mm will bow tall glasses and cakes. Use 50mm minimum, 85mm ideally.
- Keystoning. Tilting the camera up or down to fit a tall subject makes vertical lines converge. Back up and shoot longer instead.
- Back of the dish too small. With a 50mm at close range, the front of the plate dominates. Step back or switch to an 85mm.
- Background fights the food. At 45° the background is more visible than at overhead. Keep it simple — linen, plain board, single prop.
The 20/60/20 rule of composition applies at both angles: 20% of the frame is the hero, 60% is supporting context, and 20% is negative space. Hitting that ratio is what separates a styled photo from a snapshot.
Smartphone and iPhone Tips for Both Angles
Most food photos on the internet are shot on phones now, and the same angle rules apply. A few phone-specific tricks make the difference:
- For overhead on a phone: a small tabletop tripod with a phone mount and a folding arm keeps the camera directly over the food and removes your shadow.
- For 45-degree on a phone: prop the phone against a stack of books or a mug at table height. Use a remote shutter or the 3-second timer to avoid shake.
- Lock focus and exposure: long-press on the food in your camera app, then move the camera without re-tapping. This avoids the focus hunting that ruins many phone food photos.
- Skip the digital zoom: at 45 degrees with a tall glass, digital zoom exaggerates distortion. Move the phone closer instead.
On iPhone food photography specifically, the 0.5x lens is fine overhead but adds barrel distortion at 45 degrees. Use the 1x or 2x lens for 45-degree shots.
Frequently Asked Questions
What is the best angle for food photography?
The best angle for food photography depends on the dish. Overhead (90°) works best for flat, colorful foods like pizza, salad, and smoothie bowls. The 45-degree angle (3/4 view) works best for tall or layered foods like burgers, cakes, and tall drinks. Shoot the same dish at both angles and choose the one that shows the food’s best feature.
What is a 45 degree angle in photography?
A 45-degree angle in food photography — also called the three-quarter view or 3/4 angle — places the camera halfway between straight overhead and table level. From this angle, viewers can see both the top and the side of the food in one frame. It is the angle most people use naturally when looking at a plate in front of them.
What are common flat lay photography mistakes?
The most common flat lay (overhead) photography mistakes are a camera that is not perfectly level, using too wide an aperture so the back of the plate goes soft, tripod legs intruding into the frame, and the photographer’s own shadow falling on the food. A bubble level, f/5.6 to f/8, a tripod with a horizontal arm, and a wireless shutter solve all four.
What are some common mistakes in food photography?
Common food photography mistakes include shooting at the wrong angle for the dish, using a lens that is too wide (which distorts tall subjects), placing the camera off-level, over-styling the frame so the food disappears, and forgetting to wipe plates and props clean of fingerprints. Angle choice is usually the biggest single fix.
What is the 20 60 20 rule in photography?
The 20/60/20 rule in food photography composition says roughly 20% of the frame should be the hero food, 60% should be supporting context like props and surfaces, and 20% should be clean negative space. Hitting that ratio is what makes a photo feel styled rather than a snapshot.
Does angle make a big difference in bad photos?
Yes, angle makes a huge difference in food photos. A great dish photographed from the wrong angle can look flat or unappealing, while an average dish shot from the right angle can look stunning. Angle choice is the first decision to make because it determines which features of the dish the viewer will see.
Conclusion
The best angles for food photography are overhead (90°) and 45-degree (three-quarter view) — and the right one depends on what the dish has to show. Flat, topped, or patterned foods want overhead. Tall, layered, or stacked foods want 45 degrees. When in doubt, shoot the same dish at both angles and pick the image where the food’s best feature is most visible.
Practice with one dish this week — try a stack of pancakes or a bowl of pasta at both overhead and 45 degrees, side by side. You will learn more from that one exercise than from a year of guessing angles. Once the angle decision becomes automatic, the rest of food photography — styling, lighting, props — gets noticeably easier.